Saturday, February 27, 2010

A Spring Inspired Brooch

I made this little thing today to put on my bright pink sweater tomorrow at church {I have to give a talk in Sacrament Meeting and I thought it would be fun to wear}. 
I just cut out the fabrics that I wanted to use.  I also used 3 layers of Tulle, even though it is a hard to see it in the finished picture.
I did my hairspray treatment again to get the fabric to stiffen up and make it more durable.  {see previous post}
With the pink strip, I just hot glued it as I went around to give it a ruffle look.
At this point, I went around the bottom piece of fabric and trimmed it down a bit with pinking shears.
The back:
Enjoy your weekend!!
Go check out the Giveaway over at LarsenLoves, she has fabulous projects on her blog!!

Linked to:
Funky Junk's Saturday Nite Special

The Girl Creative

Friday, February 26, 2010

Jewelry Day 1

This is the first necklace that I altered today.  I think I spent less than $3.25 to make it.  The bling in the center was from a cheap adjustable ring was taken off to make it an embellishment.  It is removable so I can wear it as a "brooch" or even attach it to one of Baby K's headbands for her to wear.
Up close look.  In between the bottom layer and flowers is some tulle.  Easy...fast!!!
This pin that I added was from when I was a part of a scrapbook kit of the month from Scarlet Lime.  I miss not doing that anymore...one of these days I will sign up again.  So, there was no work or thought put into this one completely simple.
One thing that I did do to the fabric bottom piece was stiffen the fabric so that it was more sturdy.  I didn't have any official stiffener spray or starch...so, Leslie recommended using hairspray...it worked {I also dried it faster with a blow dryer}.  I pretty much soaked it, on a couple of pieces I did this process twice!
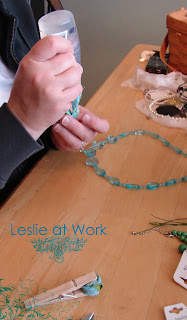
Here is Leslie at work.  Her necklace turned out FABULOUS!!!  If you notice in the bottom of this picture, she is using a clothes pin to keep the little rosette together while it was drying.
She added a little bit of tulle behind the rosettes...it looks amazing on!!!
I have more coming, so watch for it!!!
Linked to:

Funky Junk's Saturday Nite Special

Thursday, February 25, 2010

Things to do...

My friend, Leslie {aka the Maestro}, is coming over tomorrow for us to alter these $1.00 necklaces.  Yes, I bought these necklaces & bracelets all for a $1.00 each at a new little store in town {My hands felt really dirty when I left...you know that kind of store...I lysol-ed them down just in case}
I went to HobLob last night and got a selection of fabric & some tulle to make the fabric rose necklaces like you can find on http://www.etsy.com/:  {search under fabric rose necklaces}
I want to do something bright & funky...so hopefully I will have something to show tomorrow!
While at the HobLob, I always have to go down the 66% off isles, now they are marked down to 80% off.
I found this paper towel holder for $1.60 that I thought would be perfect to keep my ribbons that are still on a roll {I got 4 of them!}  That ribbon 50% and soooo cute!  I have matching fabric too!
Enjoy!

Wednesday, February 24, 2010

Craft Storage can be fun...

I love using different things to "store" my embellishments in.  Don't get me wrong, plastic containers are functional...but not cute!
I found this little silver cup at a place called The Funky Monkey while visiting my sister in Texas.  It is very Funky in there, seriously.
These buttons are from the company I used to design for {oneheart...onemind}.  The owner of the company had a vintage bracelet that she reproduced into Scrapbook embellishments.  Way cute...but I am pretty sure that they are not made anymore.
Another find at my local flea market...it is an old Ball jar & came with tons of buttons.
Have a good one!

Tuesday, February 23, 2010

Lucky "L" on my front door...

I just took my rose heart off of my front door and made this today...
My Lucky L Door Decor.
It also helps that our Last Name starts with an "L", so I can use this a lot during the year!
I used a scrap piece of foam core and cut it to a 8"x10" size.
To cover the rough edges, I just hot glued ribbon around it.
I just "plucked" the little stems off of a dogwood looking bush that I got half off at Hobby Lobby.  So, this project only cost me $4 because I had everything else on hand.
Be careful...I burned off some of my fingerprints today! ;)
You have to hold the stems down for a moment or it will not dry flat.
I had an extra picture frame hook from a previous project and just hot glued it to the back.
The "bush" had bright and dark colored stems, so I made sure that I alternated them.
I am pretty sure that either Pottery Barn or Ballard Designs had something like this.
My 12 year old son helped me figure out how to get the "L" to be straight.  I told him that I was proud that he could figure out a craft and he said, "Well, I have to learn to figure things out because I am going to be an architect when I grow up"...I can't wait for him to design my dream house...
Up close look at the tag.  I seriously made this in under a minute because the flower was premade & I just wrote "lucky" on the tag...easy, easy!  With my craft stuff semi-organized I found everything fast...Yeah!
Be LUCKY!
Linking to:
Beyond The Picket Fence
Transformation Thursday:
The Shabby Chic Cottage
giveaways


My Romantic Home
Featured on:
Childmade

Sunday, February 21, 2010

Getting There...Scrap Room Organizing

First of all, I found this repo-postcard at my local flea market...I had to get it because I am SOOOO looking forward to Spring!!
I also found this baby, a 9 section tray for storing my stuff.  I think it was orginally put on the wall and used as a display box.  Yep, I filled it up.  I have 2 other trays that look like this in the works, I am a collector almost more than a scrapper!
I am seriously embarrassed to show you this picture.  This is about 2/3 of my stuff before I started going through it yesterday.  I threw a lot of stuff away, lots of packaging that was not needed.  Then I also found a lot of duplicates of X-acto knives, adhesives, modge podge bottles and etc.
My stuff has been in the 4 corners of our house...now coming together makes me so happy.
That big ol' black thing in our corner is our computer armoire that I love but have decided that we are going to sell it and simplify to a laptop.  {it has shutter doors on the front}

Friday, February 19, 2010

LUCKY Burlap Tag Mantle Decor

I have been trying to be better about decorating seasonally.  So, here is my St. Patrick's Day decor. 
This was sooooo EASY to make...really!
I just printed these monograms off from Photoshop Elements.  I bought the monograms {click here for the link} from http://www.houseof3.com/ because they were half off last week!  This weekend they are having another sale!!
On the "L" and "K" I made them using Brushes..Click Here.
I cut them out and inked the egdes black for a more "finished" look.
Cut the burlap to look like a large tag...I wasn't perfect on cutting them...I like things that aren't perfect looking!  {size 7"x 10"}
I LOVE stickles {glitter glue}
The only thing I had to buy for this project was the streamers...super cheap & you get a lot!
I broke out my houndstooth ribbon to add a little bit more to it...I am going to paint the clothes pins black, I didn't have time today.
Enjoy your weekend!

Linked up to:


Decor Mamma
Also Linked to:

Blue Cricket Design {& Featured}

Photobucket


Featured on:
Childmade
http://www.crafty.littlerockmamas.com/