Wednesday, June 30, 2010

YW Craft & a Magnolia Junk Teaser!!

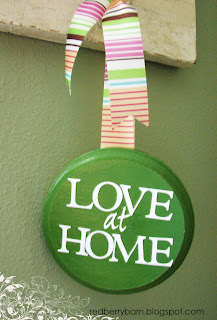
This is one of the projects that I took to YW Girls Camp for the girls to make.
It was super easy to make.
One thing I learned for someone else to know...

I decided to only bring 1 color of paint for them to use...I chose white.
Well, Mod Podge is also white...about an hour into the craft time I noticed that the girls were dipping in both the paint and the mod podge with the same brush.
Needless to say, there were several girls who had to start over.
I then got the sharpie out and marked the brushes...Crazy!!!
Then I cut out with my CriCut machine CTR in several colors for them to add to the coaster.
I got the paper at HobLob, it was in a "book" with 160 pages...I got it 50% off for $9.95!!!

You have to go to MAGNOLIA JUNK and see what Leslie and I made yesterday!!!
A Patriotic Banner!!
Have a fabulous day!

Saturday, June 26, 2010

Long Time...No Post

It was the first full week with all of the kids at home, lots of action. 
Leslie and I have been up to craftin' tons.  This is a teaser picture for you to go and see
on the other stuff we have made...
I whipped this pretty up about an hour before church because my outfit needed a little "pop"! :)
This was my thank you card for my mom helping me last week with YW Camp crafts!
She was amazing...in her element.
{I made the rosette into a brooch for her to wear}
Just a quick project I did the other day,
I had a chipboard letter "L" and wrapped it in some Jute...that's it!
This isn't a very good picture, but I attached it to the mossy landscape
and placed it on top of my kitchen cabinets.
Have a delightful weekend!

Friday, June 18, 2010

Girl's Camp Pendants and Rosettes

I spent two days at YW Camp as the Crafts Lady.
This is one of the projects that we did.
The girls loved it!
I was inspired by Ana Paula over at Get Craftin' to do this pendant.
Super easy!
I printed out inspirational words that they could put in their pendant.
This was the example for them to see.
I have pictures of the other projects that I will post soon.
It was stinkin' hot at camp and we were under the pavillion, too!
The lake water was closed to swimming because of a bad sample of water that was taken by the rangers.
So, the dad helpers at the camp decided to make a "Redneck Hot Tub" in the back of their trucks and drive the girls around the campground.  I wish I had a picture of it...priceless!  It kept them cooled off.
My brother-in-law, Steven, came by the other day.  He is in town a lot on business but too busy to stop by, so we were glad to see him.  I whipped these rosettes up really quick for my nieces and I figured that Grant wouldn't want one so he got a tag. 
We did rosettes as a project at Girl's Camp too!
My mom and I went shopping the other day and found some fabulous deals!  She found this darlin' shirt to give to my niece, Audrey.  I thought she needed a rosette also to match.  This rosette only took me 5 min. to complete!
Have a great weekend!

Monday, June 14, 2010

Cards...

Here are a couple cards that I made last week.
This was for Tommy's little friend, Caroline.
I made the rosette barrette out of red satin and added toile with some bling.
{We also got her a Sonic gift card, yum!}
The base of the card is a 6"x6" red square.
Then cut out a 4"x8" strip of black & white paper, fold in half for the middle part that opens up.
I punched a little hole on the side of the top of the card to attach the barrette.
This was a graduation card for a beautiful girl in our ward.  She had an awesome Graduation announcement card.  That picture on the card is of her wearing her red boots. 
I gave her the red peony barrette, she will look so cute wearing it!
I have some last minute YW Camp crafts to put together.  I have to be there tomorrow and Thursday for only a few hours, my mom is so nice to be my assistant.  I only had $200 budget to come up with as many crafts as I can for 160 girls!  We were able to stretch it and have 6 crafts for them to make.  I will post pictures.  It is supposed to be yucky weather most of the week, so hopefully I can keep the crafts dry!  I haven't been to YW Camp since 1989 {I only went 2 years and that was all I could handle}! 
 I haven't missed it, I'm not much of a camper...my mom on the other hand LOVES it! :)
Have a fabulous day!

Friday, June 11, 2010

Fun Stuff!!

A little teaser for you to check out what Leslie and I did today...click here:  Magnolia Junk.
I bought these canisters at HobLob last year {of course when they were 1/2 off}.
This week the decorative knobs are 1/2 off at HobLob,
so I thought it was about time to "dress-up" the canisters!
I love how they turned out!
I got the idea from:  http://www.thecreativityexchange.blogspot.com/
Have a fun weekend!

Wednesday, June 9, 2010

Master Bedroom Re-Do: Drop Cloth Headboard Slipcover & More

I have been wanting to freshen up the Master Bedroom for a while!
A Drop Cloth, Spray Paint, Fabric & Time and this is the result:
Before, the bedroom was dark with no color besides my little red nightstand
I love the splash of Blue...
Really the pictures do not give it justice...
I spray painted my nightstand a glossy brown to match Bill's nightstand.
{That picture on my nightstand is our engagement picture from almost 14 years ago!}
I bought these lamps at Goodwill and saw the potential!
I just painted them Americana Bahama Blue, used a brown stamp pad to shabby it, and finished it with Satin Varnish for the glossy look. {Super easy and fast}
I used a 6'x9' Drop Cloth {yes, the canvas painting one from Lowes} and I washed it first.
I turned it on the back side and pinned it to give me the shape to sew.  This took me a little while to do, between having 3 of the 4 kids at home...you know how that goes! :)
When I finished sewing the slipcover for the headboard, I printed off this design for the iron-on!
{I used Photoshop Elements to design this iron-on.  The Scroll is a brush from Rhonna Farrer's Creative Banners kit and then I typed in "Love is Spoken Here".}
I am pretty sure that I will add a flower/rosette on there soon!!
{I am testing to see if my sister, Janis, is reading my post...I just found out that she just likes to look at my pictures and doesn't bother to read my post...leave me a comment if you read this Janis Ann!}
Anywho, I bought a bolster pillow at Tuesday Morning for really cheap a few weeks ago and I finally made the pillow cover for it.
I just cut out the size I needed, hemmed the edges, rolled the pillow in it, and tied jute on the ends to give it the candy look.
I bought these fabrics from Hawthorne Threads, the fabric line is from Michael Miller {click here for the website link}.  They were really quick on the delivery...very impressed!
Enjoy, I know that I will!
Linked to:
The CSI Project
Visit thecsiproject.com
Beyond the Picket Fence and Featured Here
Shabby Chic Cottage
Somewhat Simple
Cheap Chic Home
Tatertots and Jello and Featured Here
I Heart Naptime
Saving Money Living Life

Tuesday, June 8, 2010

4th of July Craft & "Love at Home" Craft

Leslie and I made some fun front door hangings for the 4th of July.
You will have to see it on our blog:  Magnolia Junk !!
I made this hanging last week for my friend's birthday.
I just used an unfinished wood piece that I bought at HobLob for $0.85 {it was on sale}.
I used my Cricut to cut out the letters, painted and mod podged the whole thing.
I hammered in the sawtooth hanger in the back, slipped a ribbon through and there you go!
Quick and easy Birthday present!!
Have a wonderful day!

Thursday, June 3, 2010

Pillow Collection: Made with Canvas...

I just want to share with you 3 pillow projects that I have made.
{I found the graphics for the Welcome pillow and Chandelier pillow over at The Graphics Fairy blog, you will love her free graphics that you can download!}
This is my painted canvas pillow
{I have houndstooth on the back}.
Jen, from Tatertots and Jello, Quatrefoil stencil would be great to use on a project like this. 
I made a template of the diamond pattern and first used a sharpie to mark my lines.  Then I painted the lines in black...the lines are not perfect {I didn't want them to be}.
To get the most out of iron-on paper, I printed what I needed at the same time.
The "Welcome" sign is hot glued to the diamond painted canvas, of course I hot glued the ball fringe, too!
I made this for my sweet friend's {Leslie} birthday present! 
I took it to her and she hung it on her iron wreath stand. 
I thought that her initials on the bottom was a special touch for a present! 
I made the orange fringe out of PAPER!! 
I found a fun piece of scrapbook paper and cut out the shape {Sassafrass Lass}. 
Then I modge podged both sides to give it more of a shiny look & to make it a little more stiff.
I used double sided bias tape and sewed the paper inside the fold.  Super Easy!
Sew the layers together first before you sew the pillow together. 
 I had 3 layers here with the toile, initials and paper trim.
It was also my little sister Janis's birthday also! 
So, here is her present {it is late getting to her, so she will probably see it here first! :)}
You know when you have a great present for someone when you don't want to give it anyway! 
Both of these pillows did that to me!  But, I will be good and get this one in the mail to her...
The Scroll Label is from Rhonna Farrer and I just typed in
"Love at Home". 
You can have any saying you want in there!  The beauty of Photoshop, right!?
I used my 1 3/4" circle punch as a pattern to cut out the toile fabric for my homemade trim.
I also put Fray Check liquid on the edges to keep the fabric from fraying.
Just like the paper trim, sew the circles in the fold of the bias tape!  That's it!! :)
I also made her a barrett, using the rolled satin technique.  Of cource, I had to add a little bling to it!
I hope you enjoyed these projects, the possibilities are endless.
{I also have patterns for the diamond pillow
and the Welcome iron-on, if you would like it just leave me a
comment on my blog with your email I will send it to you.}
Have a Delightful Day!
Visit thecsiproject.com
The Graphics Fairy