Showing posts with label flowers. Show all posts

Saturday, June 18, 2011

Girl's Camp Crafts

Girl's Camp is over = Stress is over...for the moment!

I had 6 different crafts for the girls to work on.  The YW were all so good and most of all respectful, which is always nice when you are dealing with hot glue guns.

Here are two of the projects for you to see:
Satin Flowers
I taught them how to make the satin flowers that you "burn" the edges.
They had 6 colors of satin to choose from {red, yellow, orange, green, blue & purple, cut into 8x10 sheets for easy handling}.
I only had 2 candles going because I didn't want to burn down the lodge...
It was fun to watch them mix and match the colors to make their flowers.
This is a picture of a girl that really got into it...I thought it was cute that she put all of them in her hair.  She used the vintage buttons that I brought from my stash to embellish the middle.

Wooden Pendant Craft
 I just always think that you need at least one jewelry type craft.  This was a super, easy one for them to make and to show off their personality.  This is actually the one that my mom made.  I wish I would've gotten a picture of a girl that had made several of them and had them look like bangles on her necklace.
All you need: 
Wooden Disk {I got it at Hobby Lobby in their unfinished wood section}
Scrapbook Paper
Paint
Mod Podge {if they want to use paper}
Jump Rings {hot glued on back}
Embellishments
Ribbon/Twine
Beads
Stickers
At the last minute, I typed up some random words for them to cut up and paste on their pendant.
{like Faith, Love, Bloom, Be True, Create, Unique, Explore and so on...}
 There we are...my mom and I after the first day of crafts, we were pretty sweaty...my hair was sticking to my face.  That is the main reason why I hate camping is the humidity and instant sweat.  Thankfully the next day was cooler...
I would not have been able to do all of the crafts for the YW without my mom!
She is the biggest help and loves being at Girls Camp.
When my siblings and I were little, we always enjoyed mom being gone for a week to girls camp because my dad would feed us cake for breakfast, take us to amusement parks and play the whole time; party when momma is out of the house!
 So, last Tuesday I just got all comfortable in my bed, ready to go to sleep and then all of the sudden it sounded like our roof was about to tear off!  The rain and wind was so bad that I couldn't see outside...it doesn't help my anixety of bad weather that lightning struck in our backyard.  The first thing I thought about were the girls & leaders at camp and also my oldest son at Scout Camp.  Bill and I got on our knees to pray for protection for all of those out in the elements.  We knew this crazy storm was headed their way.
The next day was when my mom and I were heading up to camp, there were tons of trees down and debris all over.  We get to camp {an hour away} and found out that a tree fell on a tent from my ward.  The leaders heard that a bad storm was coming and gathered the whole stake in the lodge.  It was a good thing because 3 of our YW would've not made it if they were in that tent.  Very humbling and also so grateful that our prayers were heard and answered!  In this picture they had already cleared a lot and pulled out the tent.
I will post my other projects later...
Have a wonderful weekend!

Tuesday, November 23, 2010

Count Your Blessings...

I Count my Blessings everyday! 
I am so grateful for this time of year that we can reflect on our
Blessings, Family and Friends.

This was seriously one of the quickest projects I have ever made!
I wasn't even planning it, it just happened!
I bought these fall picks from HobLob and had them sitting on my table.
In my view, I saw my vintage spool sitting on my bookshelf.
I just stuck the picks in and that was it! :)
I cut a piece of burlap and added a little label.
 This is the sideview...

This week I am a part of the
 6 Days of 24 Homemade Ornaments
My project will be posted on Thursday. 
You have to go and check out what the other bloggers have been making! 
Awesome ideas for your Christmas Tree & Gifts!
UndertheTableandDreaming 
Have a wonderful day!!!

Friday, November 19, 2010

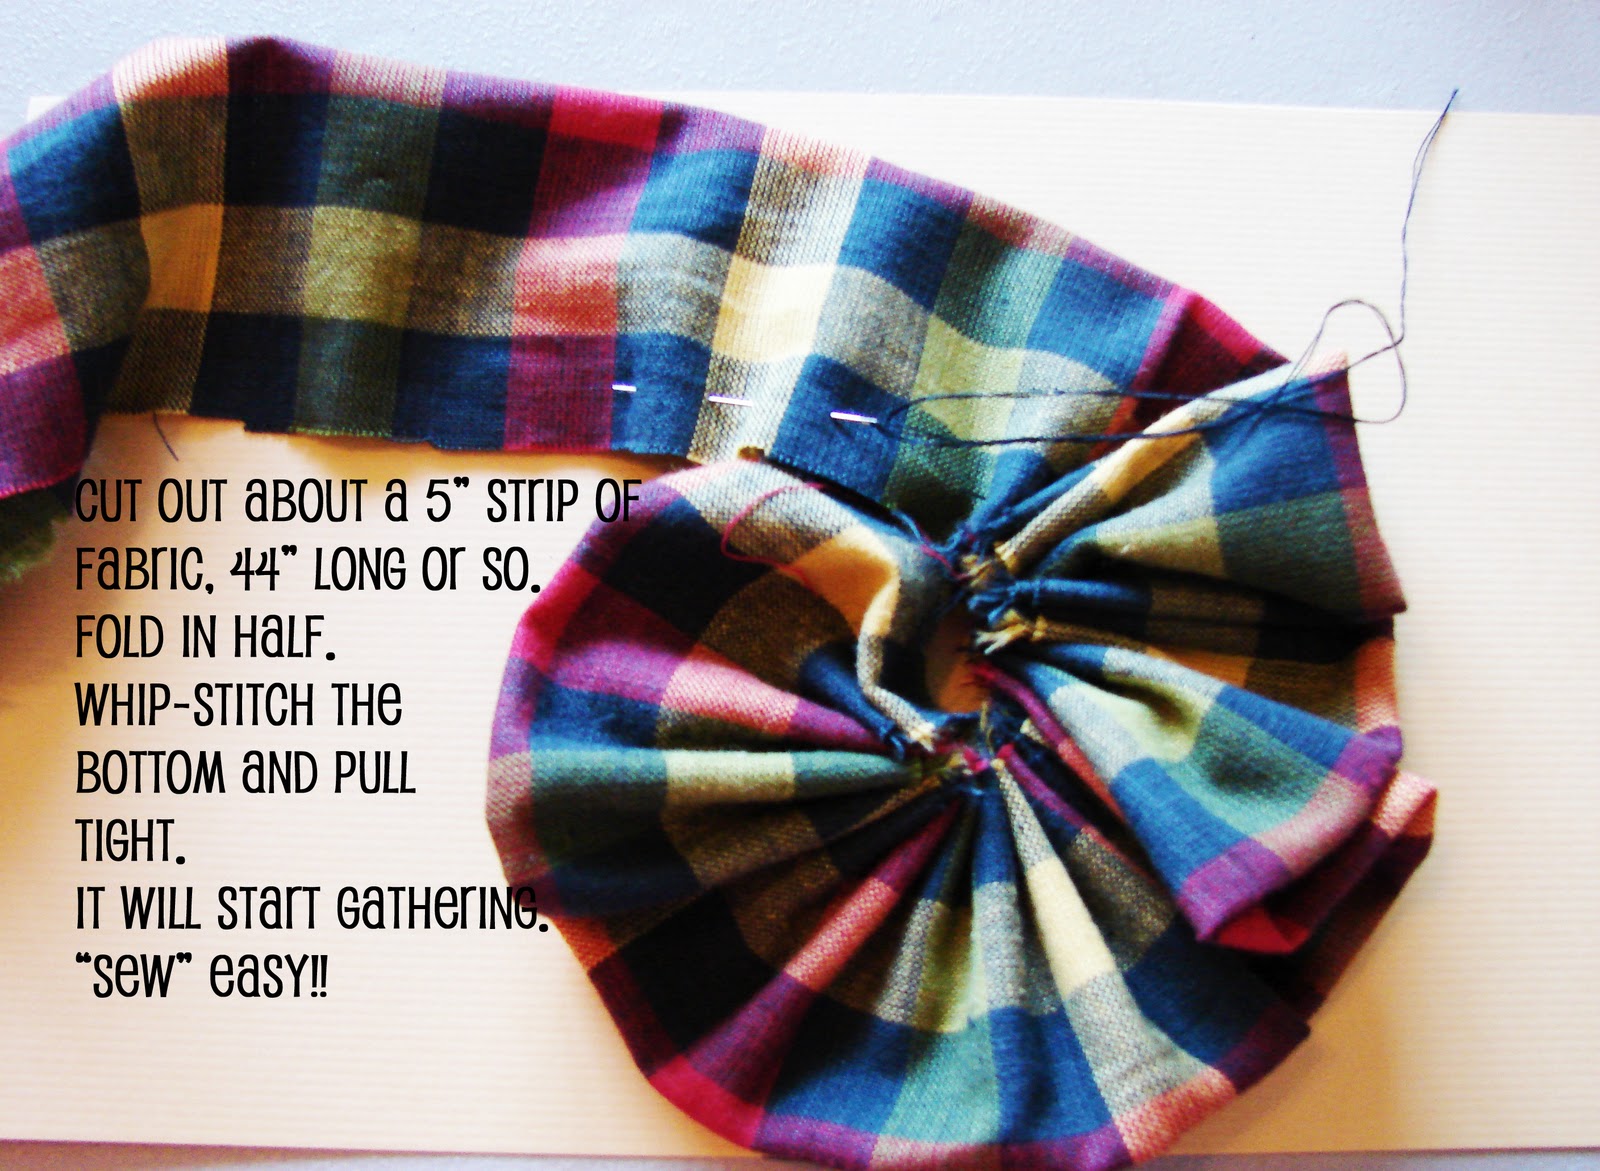
Flowers...{with tutorial}

I have been gathering the outfits
that we are going to wear for family pictures. 
I knew that I wanted to make a flower brooch for Kate and I to wear. 
This is what I came up with...my new favorite flower!!
 I used the same technique for Kate's flower,
I just didn't cut slits into the fabric.
Kate and I are pretty matchy-matchy for the pictures,
 the boys are wearing sweaters with a collared shirt under. 
{a mix of blue, green, white, brown; stripes & plaids!!!} 
It looks good laying out on my bed...
I figured that if I don't like all of the colors together
when I look at the pictures that I always have the
option of turning them to black and white!
 A little tutorial:
 Have a wonderful weekend!
Featured on:
Tatortots and Jello Facebook Page!!

Friday, October 29, 2010

Feelin' Grateful!!

I started on my first Thanksgiving Project today! 
I just love the colors of fall!!
This is just a sneak peak, I will have it on display Monday
once I put my Halloween decor up!
 I bought the letters at my favorite flea market...
Speaking of flea market, my sister is at the Canton, TX mega flea market weekend today! 
I am super jealous!
 This is how I made the flower...

 Then attach the ribbon to the back of the fabric flower.
Have a fun Halloween weekend!

Wednesday, October 27, 2010

Flowers for Silent Auction

I am donating this for my son's Costume Carnival Silent Auction.
The money that it makes will go directly to his classroom.
 The flower in the bottom middle section is my new favorite. 
I made it with embossed felt, so it gives it a little texture! 
I have a mix of brooches and barrettes, with one bobby pin.
For the display, I thought it would be nice for people to see it in a hair bow holder
that is included!
I hope that it makes some moo-lah for his teacher!!

Monday, October 4, 2010

My projects for "Super Thursday"

In our ward, we have started to have our "Super Saturday" craft day on Thursday nights.  Last year when we had it on Thursday we started at 6pm and we were cleaned up, lights out by 9:20pm.  You know how that is a huge deal when you are dealing with dozens of fun ladies doing crafts. 
I am actually in Young Women's now, but the new "Enrichment" leader asked me to do a couple of flowers.
I have been trying to let the sisters know that you can make these even if you don't have little girls.  I have been "marketing" it by giving them other ideas of how to use them...on their belts, purses, boots, present toppers, brooches, and more...

With this felt flower, I just made a little template of a petal and cut out 7 petals for the base layer and 5 for the next layer.  The middle circle has clear beads that are sewn on.  You can make about 4 complete flowers on one sheet of felt.
 Kate has finally started getting hair on top {she has mostly had a "party in the back" kind of hair}.  She was so busy when I was taking these pictures.  
Have a Beautiful Monday!!

Thursday, September 23, 2010

A Present for my Sweet Friend...

I'm not quite sure if my friend, Rachelle, reads this blog or not...but if so, pretend like it is a surprise when you get it in the mail!  Rachelle and I met each other our freshman year at Utah State back in '92.  My southern accent was so thick that she thought my name was "Jenae" not "Jenny" {like how Forrest Gump says it}.  We had a good laugh when I finally told her months later that my name was "Jenny"...not "Jenae". :)

I thought it would be fun to make her a bracelet/brooch for her birthday {a 2 in 1 present}!  The pictures really do not do it justice...it is very elegant in person.  It was one of those presents that I was tempted to keep it myself  {that is when you know it is a really good present to give, right? :)}
I started out with a bracelet that I found at Walmart...
This is how the brooch attaches to the bracelet {I'm sure that you already figured that out!}
I just had to try it on...
Happy Birthday Rachelle!

Linked to:

Tuesday, September 14, 2010

A BIG flower for my Belt...

I have seen these flowers around the crafty blogs and
have been wanting to make a super large one for a pillow.
Late Saturday night, I decided that I needed to make something for my all black dress for Sunday.
It is about 5 1/2" in diameter...yes, it is a big one! :)
I used just one sheet of red felt {20 cents at walmart}.
There are 3 layers of petals.
The middle petal is actually a circle that I folded.
I hot glued all of the petals onto a large felt circle.
Then I added a barrett to help me attach it to my belt!
Super Duper Easy...I will definitely be making more of these!

Have a beautiful day!

Wednesday, June 30, 2010

YW Craft & a Magnolia Junk Teaser!!

This is one of the projects that I took to YW Girls Camp for the girls to make.
It was super easy to make.
One thing I learned for someone else to know...

I decided to only bring 1 color of paint for them to use...I chose white.
Well, Mod Podge is also white...about an hour into the craft time I noticed that the girls were dipping in both the paint and the mod podge with the same brush.
Needless to say, there were several girls who had to start over.
I then got the sharpie out and marked the brushes...Crazy!!!
Then I cut out with my CriCut machine CTR in several colors for them to add to the coaster.
I got the paper at HobLob, it was in a "book" with 160 pages...I got it 50% off for $9.95!!!

You have to go to MAGNOLIA JUNK and see what Leslie and I made yesterday!!!
A Patriotic Banner!!
Have a fabulous day!

Thursday, May 27, 2010

Summer Flower Front Door

Today I have this project being featured over at Singing Three Little Birds blog, she is having a Flower Week with a lot of amazing projects...go check it out!
I was needing a summer look on our front door, I really love how it turned out!
My new favorite item to work with right at the moment is Canvas!!
TUTORIAL:
I first cut out a piece of canvas that I bought off a bolt at Hobby Lobby and applied Gesso primer on it.
Then I used the Quatrefoil stencil from Tatertots and Jello...thanks Jen for sharing it!! {click here for link}
I used Americana Paint {White Wash}& Apple Barrel {Caribbean Blue} paints.
I made a stencil of a large and small petal
{If you want the template of the petals I did,
leave me a comment with your email and I will send it to you!}. 
Then I gathered the base and used hot glue to keep the shape.
I cut 5" circle of foam core and felt {not perfect}.  Then I punched a hole in the middle for the knob screw to come through to hold the finish flower together.  Hot glue the petals around and layer the small petals on top.
I cut out about 5 circles in different sizes...not perfect again and put it in the middle.
This is a close-up picture of the finished look.  I just bought the glass knob at Lowes and added a little bling to the middle.  With scrap painted canvas, I made a little tag with rub-on letters.  I love the word BLOOM!!
This is a back side, just in case you were needing a peek!
It is a pretty bright flower, especially from the road.  But, everytime I am coming and going from my house...it makes me SMILE!!
You can really do this project in all different sizes! 
I know that I will be doing a lot more with painted canvas this summer!
Enjoy! 
 to see all of the fun projects she has showcased!}
Here is the link to how I made the frame earlier this year.
Linked To:
Blue Cricket Designs              Creations by Kara

Thursday, May 20, 2010

More Flowers..Real & Fake

Isn't this so beautiful...I am lucky to have this in my front landscaping, they smell divine!!
I love how the rose is packed with tons of petals!
My Clematis flowers just bloomed this week!
They vine up the side of the house close to the front door.
I love the deep purple!
I made this purple barrett today for a little girl that is in my son's class.
They celebrated her birthday at one of those indoor inflatible playlands, he had a blast!
I hope she likes it!
Have a fun day!

Tuesday, May 18, 2010

Satin Peony Tutorial

I learned how to make this flower from a video tutorial from Rhonna Farrer
For all of you wanting to know how to burn the edges to make petals, this is the video for you to watch!
It is a long video jammed packed with tutorials and helpful tips!  Rhonna is so cute and it is fun to watch her show all of her fabulous creations.
I made the flower that she is wearing on her belt in the video.  This flower is about 5" in diameter.
I just took pictures as I went...
I cut a strip of satin about 2" to start and then slowly made the end bigger at about 3".
Cut slits that will become the individual petals on the strip.
"Burn" each petal individually with a candle {don't put it in the fire, but just on the very edge of it}
Get some thread and weave in & out on the bottom to ruffle up the strip.  This makes it easier to attach it to the base.
I just cut a circle out of felt as the base.  Start with the smaller end in the middle and spiral from there.  I had to trim the felt a little when I was done attaching the petal strip with hot glue.
I made it into a barrett.
So much fun...you have to try it!!
Linked to:
Someday Crafts