Showing posts with label banner. Show all posts

Friday, July 1, 2011

"Boom" banner

I just have to share this banner that Shaela from Signed, Sealed, Delivered made using Canvas Corp products.  I just love the vintage feel that the burlap adds to the banner!!


Products used:
Canvas Corp: Patriotic Paper {Stars, Stripes, Kraft}, Burlap mini Shapes {star, round}, burlap, rope
Have a fantastic weekend!

Wednesday, April 27, 2011

British Flag Banner...Getting ready for the big day!

My sister-in-law, Jessica, and a couple of her friends came up with this grand idea to host a William & Kate wedding party and watch the wedding together on Friday.


So, Jess roped me into making a few decorations for the big day.


I made this "abstract" version of a British flag...don't look too close, it looks like my Kindergartner made it. :) Of course I had to add a little burlap to it.

{side note: I actually have a son named William and a daughter named Kate...I wonder how popular those names will be now with this royal wedding!}

I will post more of the decorations when they are finished. It should be a cheery day!

Friday, April 22, 2011

Spring Burlap Banner

Who doesn't love a sweet Spring banner on their mantle?
This was a fun one to create...maybe it was the colors
that make me happy!
{for more detailed pictures of this project click here}
I do have to show you what I used for the grass.  I used Canvas Corp Canvas Mini Star
shape, painted it 2 different colors {DecoArt:  Avocado Dip & Hauser Light Green}. 
 Then I folded it in half and ta-da you have a piece of grass!!
This is a picture of a canvas shape before and then what it looks as grass!

 I used Bahama blue and free-handed the letters...you can stencil or do whatever for the letters.


 Enjoy your Spring Day!
Linked to:
Tatertots and Jello
504main

Monday, April 18, 2011

Spring Banner Lampshade

I was a part of
 last week, this is the project that I shared.
You have to go and check out all of the fun projects
that was posted on Kara's blog!!
I just have to tell you a little story behind my history
of lamp-making before we get started.
Back in college {years & years ago}, I had no money.  So, for
presents for my friends and family I found a way to be creative and make something
for them.  I figured out a way to make lamps out of huge, empty pickle jars that
the snack bar at *-mart would just give to me.  One day, as I was making a lamp,
my husband {boyfriend at the time} came over to my place and thought it was
a fun little project and was impressed with my resourceful use of materials.

 As I was making this one...it has been a very long
time since I have made one, he came in and told me that he knew that he loved
me that day that I was making lamps almost 15 years ago.  I thought it was so
sweet to know that he loves me being creative!  Ok...back to the tutorial...

 I found this jar at my local flea market, spray painted the lid blue and had my hubby drill two holes in the top.
This jar is about 1 foot tall, you can find a lot of fun shapes and sizes of jars.
 Before I embellished it...which I also like it plain and simple.
I bought the lampshade at Target, but you can also
make your own burlap covered lampshade!
 You can buy a lamp making kit pretty much anywhere in the hardware section.
You thread the cord through the little hole and then back up the middle hole.
The kit comes with really good instructions also.
 You split the two wires apart a little bit more {about 3" more}.
 In the instructions, it shows you how to make an Underwriter's Knot.  You have a ribbed and a flat wire and you have to wrap the right one to the right screw on this part, otherwise it doesn't work. 
I tested mine to make sure it worked before I got any further!
 Once I had that done, to make the fixture stable, I hot glued it on the inside.
 Here are a couple of close up shots of the banner part.
I used Canvas Corp, Tattered Angels, Houseof3/Pink Paislee, Glitter, ModPodge,
 American Crafts ribbons & Crystal Stickers.
In this picture, I used a mini canvas shape and twine{both canvas corp} and sprayed it
with Tattered Angels Glitter Mist.  My new favorite thing!!

 This is a side view of the lamp, I am loving it on my entryway table along with all of my Spring-y decor!
 I just had to show that I tied ribbons on the lid and also added some bling around the top edge!
You can fill the jar with a lot of fun and interesting items, I chose a simple little
nest.  Maybe because I can't get enough of them!
I hope that you enjoyed my little tutorial and that it inspired you in some way!

Saturday, April 2, 2011

Canvas Corp Banner Contest Winners...

Grand Prize Winner:
Melissa Waterbury
She just started a blog today!
Go and become a follower of hers:  http://www.distresseddainties.blogspot.com/
I love the dimension that she created in her banner...simply gorgeous!
She teaches banner classes at her local scrapbook store, you can see why...
Another view:
 2nd Place Winner
Cassie Box
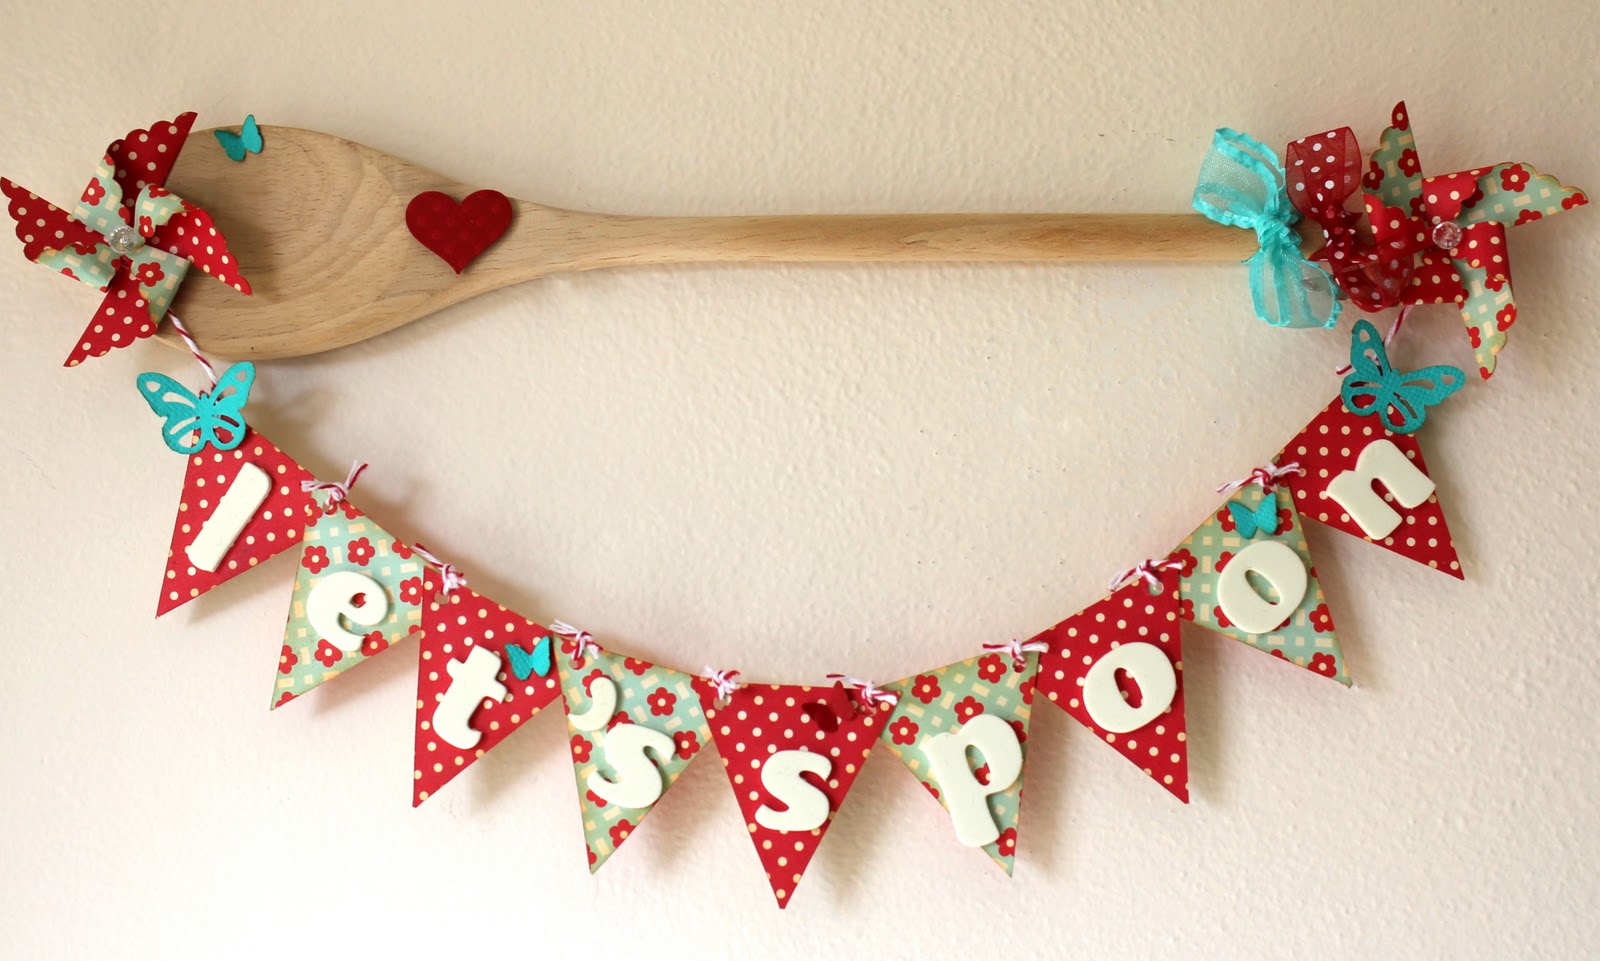
"Let's Spoon"...so cute!  This would be a darling addition to any kitchen!  I also thought when I first saw this that it would be a cute wedding gift!  Cassie also sells banners on her etsy shop, go check out all of her banner designs!
 3rd Place Winner
Malia Karlinsky
I am so inspired by Malia's colors that she used, it makes me want to go back to school!
I need to find out where she got her flashcards!
 Honorable Mention:
Mandy Beyeler
She has a darling website here:  http://www.sugarbeecrafts.com/
A computer banner, what a great idea!!  She has a tutorial on how she made
this and got it to attach to her screen.  She has tons of great ideas!
 Honorable Mention
Melissa Kaiserman
You have to go visit her at http://www.atimeforeverything.net/
Isn't this the sweetest lampshade ever! 
And yes, I will be making one of these soon!
 Honorable Mention
Jenn Erickson
This banner has sentimental value, she has the clocks on the
exact time that big events happened in her life...so inspirational!
Visit her on her website:  http://www.rookno17.com/
Now with all of the inspiration from all of the banner entries...I need to get to work!!
I will also be featuring the other gals that entered the contest.
Have a great Spring Day!

***Just to let you know, the Canvas Corp blog is temporarily down
while we are updating and giving the blog a new and fresh look. 
You can keep track of us on Facebook while we are under construction!***
We will be starting our next contest soon, so keep in touch!!

Tuesday, March 22, 2011

Bloom & Grow Banner

This is a banner that I made to attach to my fun little cabinet door that I
got at the flea market. 
It is sitting on my ledge in the entryway to greet our guests...

I made it to hopefully inspire you to enter the
Canvas Corp Banner Contest,
it ends on March 31st and they have amazing prizes for 3 lucky winners!
I used Canvas Corp Burlap and Canvas Shapes to make this.
The "l" and the 2nd "o" are on a little 2"x2" stretched canvas.
{you can click on the picture to get a better look}
Have a fabulous Spring Day!
Linked to:
Lovely Crafty Home

Friday, March 18, 2011

Misc Friday...& Banner Contest

Canvas Corp has some amazing Handmade, embossed and flocked paper.
These are some of the samples of them.

One of my favorite places to shop when I go to Utah is Tai Pan Trading.
That is where I got this metal Welcome sign.
I told my husband that we are going to pack light this summer when
we go to visit because I will pack it to the max for the ride home.

Don't forget to enter in the Canvas Corp Banner Contest!
You have a chance to win some amazing product packages!
Here is the link to all of the info:
Please email me if you have any questions!!


Today we had to do a little updating of our computer and printer...
It was a long time coming, but we just couldn't drag it on any longer.
Good bye slower than molasses computer, hello mega speed!
So, I was able to get the nicest printer that I have ever had.
No more trips to *-Mart for photos!!
I chose an Epson Artisan 835 because it is more for the person
that wants to print out quality photos...like me!
Have a fabulous weekend!

Tuesday, January 25, 2011

Tommy's Birthday...

Our little Tommy's Birthday Party was on Saturday.
It was so much fun...
I made this Birthday banner to hang on the wall behind him when he blew out the candles.
{it is still hanging up because I like it so much!}

I used Canvas Corp Papers and Canvas Triangles.
The Me and My Big Ideas stick boys always reminded me of my boys.
The triangles that spell out his name are actually placed inside a
triangle cellophane bags that I got at HobLob in the gift wrapping section. 
So, it adds a little bit of shine...
Party Favor Bags... 
Simple lunch sacks that I wrote their names on
and added the Me & My Big Ideas Stickers to.
Tommy has always been obsessed with Mustaches. 
So, I thought it would be fun to have a Mustache party. 
I went to HobLob and bought some Felt with a sticker backing. 
Martha Stewart has Mustache Templates {click here}.
{you can see one of them on the DVD player}

I just had to laugh that the kids were using their mustaches as
unibrows, chest hair, rats tails, chops...you name it they did it!
We even had "Attach the Mustache" game like Pin the tail on the Donkey.

Wednesday, January 12, 2011

Valentine's Decor--Entry Table

I got out my Valentine's Day Decor today that I made from last year.
I am sure that I will be adding to this as the days go by!
Looking at this picture, I need to put something on my ledge above the banner!

For Christmas, Bill's parents gave us this picture of the
that we were married in 14 years ago!  Love it!!
 This is a lamp that I bought at Goodwill and spray painted it black. 
I covered the lampshade with burlap last spring{click here for the tutorial}. 
It needed a little color, so I attached a large barrett to it
 Easy, Easy!
 I got this glass bird container for Christmas from my sweet in-laws!
 I love it!
I just dumped some red pom-poms in it for color...and warm fuzzies!
 This is a banner that I made last year out of burlap. 
It was on my banner last year, but it found its way over to the Entryway this year!
Enjoy your day!
Featured on:

SAS Interiors

Linked to: