Friday, April 29, 2011

The Wedding Watch Party!!

Wasn't Princess Kate stunning today, I also think Prince William was dashing himself!
It was fun at the party even though I wasn't able to stick around for too long.
I just wanted to share with you the photos of the decorations that were made
for the big day!
When I was making this banner, I thought everything needs just
a touch of burlap...
This was the embellishment on the coffee filter wreath that Jessica made for the front door.
I used Canvas Corp burlap shaped heart as a perfect backdrop to the royal couple.

This was the refreshment table, the color of Alicia's dining room was perfect for the royal wedding also. Jessica found these faux branches at Hobby Lobby that we hung pictures of William and Kate plus some extended family on it. We added a little bit of chandelier crystals to it for a fancy touch.

On some of the tags, with the help of my sister...Janis, we added a coffee filter to create a wedding dress look, just for fun!

I just adore this picture of Princess Diana and her boys, she was such an amazing mother to them. Simple addition to the bottom of the branches was a strip of burlap tied into a knot with a painted {canvas corp} canvas mini heart with W & K initials on it. I also used a Canvas Corp mini clothespin and covered it with bling.

Jessica found these monogram sandwich picks at Hobby Lobby for her cucumber sandwiches, yum!

The ultimate was this fabulous Donut Wedding Cake...

Here are the little favor bags filled with the pearl-like Sixlets.
Here is a glimpse of Jessica {left} and Janis wearing their hats to celebrate the occasion.
I hope that you enjoyed seeing the watch party.
What a beautiful wedding. I wish William & Kate many years
of happiness...

Thursday, April 28, 2011

A Sneak Peek to William & Kate's Wedding Party Decorations

This is a little part of a wreath with William & Kate's engagement photo.

It says "Wuv, True Wuv" a tribute to The Princess Bride movie...

I used bling embellishments to try to make a mini British flag on the tag.

This is a tiny part of the big centerpiece that we made...

I can't wait to show you tomorrow!!

I used Canvas Corp's mini bags to have as favors.
Jessica found these wedding sixlets that look like pearls that
will be in the baggies.
{click here for a place to buy these cute mini bags}

I have a sister named, Janis, and she has a very special humor
about her. If you know her personally, you know what I'm sayin'.
See never reads my blog, so I can say that. :)
This is a sneak peek of her special hat that she will be stylin' at
the party at 9am in the morning.
She will be the talk of the town...like she is already.


I will have a post tomorrow in the afternoon of what the

party looks like finished.


Wednesday, April 27, 2011

British Flag Banner...Getting ready for the big day!

My sister-in-law, Jessica, and a couple of her friends came up with this grand idea to host a William & Kate wedding party and watch the wedding together on Friday.


So, Jess roped me into making a few decorations for the big day.


I made this "abstract" version of a British flag...don't look too close, it looks like my Kindergartner made it. :) Of course I had to add a little burlap to it.

{side note: I actually have a son named William and a daughter named Kate...I wonder how popular those names will be now with this royal wedding!}

I will post more of the decorations when they are finished. It should be a cheery day!

Tuesday, April 26, 2011

Inspired by...

Another week of fun inspiration and things to put on my list to do!

I think that Kate needs a room just like this one from Isabella and Max Room's blog.
I just love the color combos that she put together...gorgeous!

Lovin' this Athropologie inspired shower curtain!  Tutorial over at Taylor Made Blog!
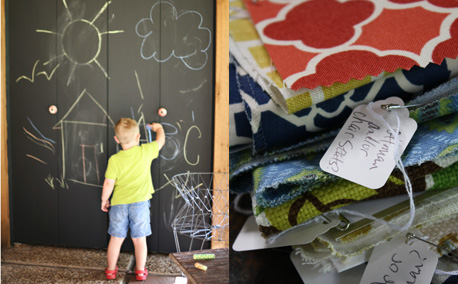
I have always loved this idea from Holly Mathis Interiors to put chalkboard paint on closet doors for the little ones {or for me} to doodle on.
Photo 2
I am looking forward to what Matthew Mead has in store with this Summer Magazine! 
You can only order on his website HERE.

Look how cute this is:  A Birthday Countdown Cake over at Holiday Snobs blog.
I also am in love with that chair that it's sitting on!


My mouth is watering...Chicken Gyro's made by Fudge Ripple!  Her recipe HERE
Enjoy your Spring Day!


Friday, April 22, 2011

Spring Burlap Banner

Who doesn't love a sweet Spring banner on their mantle?
This was a fun one to create...maybe it was the colors
that make me happy!
{for more detailed pictures of this project click here}
I do have to show you what I used for the grass.  I used Canvas Corp Canvas Mini Star
shape, painted it 2 different colors {DecoArt:  Avocado Dip & Hauser Light Green}. 
 Then I folded it in half and ta-da you have a piece of grass!!
This is a picture of a canvas shape before and then what it looks as grass!

 I used Bahama blue and free-handed the letters...you can stencil or do whatever for the letters.


 Enjoy your Spring Day!
Linked to:
Tatertots and Jello
504main

Wednesday, April 20, 2011

Burlap Framed Nest

Today on the Canvas Corp blog I shared a tutorial
on how I made this...
 I had so much fun making this, it was one of those projects
that came together quickly...my speed!
My new favorite thing {besides anything Canvas Corp} is
Tattered Angels Spray Mist!!!
Linked to:


Tuesday, April 19, 2011

Inspired by...

Inspired by...
Roeshel at The DIY Showoff is having a fun party and giveaway
 this week on her blog.  She made these fabulous
 eggs on display using twine!
The DIY Show Off

Older than dirt Jar from Brown Paper Packages:
The tag says:  "Just a friendly reminder that you are now older than dirt."
{the dirt is crushed up oreo cookies...brillant}

I will have to use this coral image on a project soon!
From The Graphics Fairy, my go-to blog for great vintage downloads.
I would love to receive any {and all} of the cards that Cherry's Julbilee makes!!
Beautiful dress made by Ellie G. at Less Cake More Frosting for her daughter.
I just need to get off my lazy sewing-ness and make one for Kate!

Yes, Please!!
Boston "Black Forest" Cream Pie is callin' my name
Julie at Mommie Cooks makes some of the most fabulous creations.
I just wish that I had an edible screen! :)

Monday, April 18, 2011

Spring Banner Lampshade

I was a part of
 last week, this is the project that I shared.
You have to go and check out all of the fun projects
that was posted on Kara's blog!!
I just have to tell you a little story behind my history
of lamp-making before we get started.
Back in college {years & years ago}, I had no money.  So, for
presents for my friends and family I found a way to be creative and make something
for them.  I figured out a way to make lamps out of huge, empty pickle jars that
the snack bar at *-mart would just give to me.  One day, as I was making a lamp,
my husband {boyfriend at the time} came over to my place and thought it was
a fun little project and was impressed with my resourceful use of materials.

 As I was making this one...it has been a very long
time since I have made one, he came in and told me that he knew that he loved
me that day that I was making lamps almost 15 years ago.  I thought it was so
sweet to know that he loves me being creative!  Ok...back to the tutorial...

 I found this jar at my local flea market, spray painted the lid blue and had my hubby drill two holes in the top.
This jar is about 1 foot tall, you can find a lot of fun shapes and sizes of jars.
 Before I embellished it...which I also like it plain and simple.
I bought the lampshade at Target, but you can also
make your own burlap covered lampshade!
 You can buy a lamp making kit pretty much anywhere in the hardware section.
You thread the cord through the little hole and then back up the middle hole.
The kit comes with really good instructions also.
 You split the two wires apart a little bit more {about 3" more}.
 In the instructions, it shows you how to make an Underwriter's Knot.  You have a ribbed and a flat wire and you have to wrap the right one to the right screw on this part, otherwise it doesn't work. 
I tested mine to make sure it worked before I got any further!
 Once I had that done, to make the fixture stable, I hot glued it on the inside.
 Here are a couple of close up shots of the banner part.
I used Canvas Corp, Tattered Angels, Houseof3/Pink Paislee, Glitter, ModPodge,
 American Crafts ribbons & Crystal Stickers.
In this picture, I used a mini canvas shape and twine{both canvas corp} and sprayed it
with Tattered Angels Glitter Mist.  My new favorite thing!!

 This is a side view of the lamp, I am loving it on my entryway table along with all of my Spring-y decor!
 I just had to show that I tied ribbons on the lid and also added some bling around the top edge!
You can fill the jar with a lot of fun and interesting items, I chose a simple little
nest.  Maybe because I can't get enough of them!
I hope that you enjoyed my little tutorial and that it inspired you in some way!