Friday, December 3, 2010

Canvas Ornaments

{This is my post from Under the Table and Dreaming's 6 days of Ornaments last week}
Altered Canvas Ornaments
While I was designing and making them, I thought that the
possibilities are endless on what you can put on the canvas.
You can add pictures, mod podge papers, flowers,
handprints, perfect neighbor/teacher gift and so on!
Supplies Needed:
Paint {Paint Brush}
Small Canvas
Ribbon {3/8" & 1.5"}
Optional: fabric {the Noel one I used fabric}
Glitter balls {from a pick}
Hot glue
Poster Marker
Brooch {I used a brooch for the hanger in the back}

1.  Paint your canvas, let dry.
2.  Use a Poster Marker to write on the canvas
{this is where your creativity can go wild!}
3.  I just cut them off of the stem, I used about 24 balls on each canvas.
I bought these glitter ball picks at Hobby Lobby when they were 1/2 off!
That is the only time I buy anything there!

4.  Hot Glue the thin ribbon around the edge of the canvas, to give it a finished look.
5.  Hot Glue the balls around the canvas {be careful because
I burned my finger really bad doing this step}.
6.  Make your own ruffles!!  Just sew in and out on the bottom of the ribbon
and then pull the thread to gather the ribbon.
I made the black w/white polka dot ruffle using fabric.  Cut a 3 1/4" x 40"
strip of fabric, fold it in half and then sew the edges together.
7.  Hot Glue the ruffle to the back of the canvas.
8.  Attach the brooch, or whatever you use for the hanger, to the back.
I hope you will enjoy this project. 
I already have plans for my kids to make some!

Have a fabulous weekend...I will because my hubby and I
are going to see Brian Regan!!!


Tuesday, November 23, 2010

Count Your Blessings...

I Count my Blessings everyday! 
I am so grateful for this time of year that we can reflect on our
Blessings, Family and Friends.

This was seriously one of the quickest projects I have ever made!
I wasn't even planning it, it just happened!
I bought these fall picks from HobLob and had them sitting on my table.
In my view, I saw my vintage spool sitting on my bookshelf.
I just stuck the picks in and that was it! :)
I cut a piece of burlap and added a little label.
 This is the sideview...

This week I am a part of the
 6 Days of 24 Homemade Ornaments
My project will be posted on Thursday. 
You have to go and check out what the other bloggers have been making! 
Awesome ideas for your Christmas Tree & Gifts!
UndertheTableandDreaming 
Have a wonderful day!!!

Friday, November 19, 2010

Flowers...{with tutorial}

I have been gathering the outfits
that we are going to wear for family pictures. 
I knew that I wanted to make a flower brooch for Kate and I to wear. 
This is what I came up with...my new favorite flower!!
 I used the same technique for Kate's flower,
I just didn't cut slits into the fabric.
Kate and I are pretty matchy-matchy for the pictures,
 the boys are wearing sweaters with a collared shirt under. 
{a mix of blue, green, white, brown; stripes & plaids!!!} 
It looks good laying out on my bed...
I figured that if I don't like all of the colors together
when I look at the pictures that I always have the
option of turning them to black and white!
 A little tutorial:
 Have a wonderful weekend!
Featured on:
Tatortots and Jello Facebook Page!!

Monday, November 15, 2010

Have a Gratitude Attitude!!

I just had to make a "Have a Gratitude Attitude"
sign for my freshly hung old window. 
I designed the graphic using Photoshop Elements,
I used my House of 3 brushes for the label and scroll
 {I love anything that the gals over at House of 3 design.
I printed out the saying and cut it out.  Then I was going
through my paper stash and found this
Heidi Swapp paper that was a perfect fit for the saying,
Then I did a quick gold glittering to add a little sparkle.
My project wouldn't be complete with out a little burlap! :)
 I just couldn't resist the chandelier crystal from HobLob. 
I knew I had to use it for a Thanksgiving project!
I have had this window sitting in my garage for 3 years! 
What was I thinking not bringing it in sooner!!!
{it is about 2'x3'}
My pictures aren't the best of this project, it looks so much
better in real life! :)
Enjoy your day!!

Thursday, November 11, 2010

Life Story Scrapbook

My friend "commissioned" me to put together a
scrapbook for a co-worker's mom. 
It is a surprise for her,
I hope that she will enjoy it! 
She had typed up several pages of her life story
and I was able to put it together for her. 
I would've loved to show you how I scrapped the pages,
but for her privacy I won't.
I bought a pack of GCD Brand "Paris Nights" paper
that had flocked damask and foiled papers. 
It was a very classy set of papers to use for a "life story" kind of scrapbook. 
The scrapbook is red linen and I bought
that little "P" {her last name initial} at Hobby Lobby.
I haven't really scrapped in a while...I am really behind in doing scrapbooking for my family. 
Maybe it will be one of my many things that I need to add to my New Year's Resolution List!! :)

Wednesday, November 10, 2010

Thanksgiving quote & YWIE night

{I am being featured today over at
This is a quote that my Grandma had written on her
check register years ago. 
She must have seen or heard it somewhere and had to write it down. 
I just love having it in my Grandma's Handwriting.
My aunt had it framed.  It says:
"We are all Pilgrims on the Journey of Life. 
We travel in harmony through Brotherhood,
or we perish along the way through strife."
I just think of the faith that the first Pilgrims had traveling in horrible
conditions to find a better life and for them to worship as
they want.  I know that all of us have a special journey in life
and it all depends on our attitude and to be thankful always.
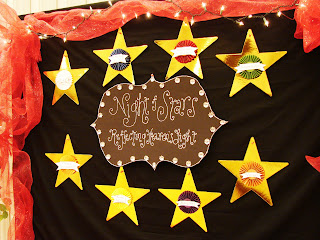
 Last week was our Young Women in Excellence Program at church.  It was very successful!!  Our theme was "Night of Stars, Reflecting Heaven's Light".  We wanted an "Oscar Night" vibe.  We had the Priests in our ward escort each Young Woman out in front of our "Paparazzi" wall seen here.  They had their picture taken there.  We had previously asked them this question:  "My favorite value is_____, Because______."  While they were walking the red carpet we announced the YW's answer to the question.  We had someone playing the piano softly in the background. 
 Close up of the stars that I made for our Value Paparazzi Wall.
 Just a view before it started.  I was able to borrow a real read carpet for the paparazzi wall.  
{bottom left in the picture}
 We had delicious refreshments. 
You can't ever go wrong with a chocolate fountain!  :)
One of the leaders made a beautiful fondant cake!
After the girls sang the opening song {Courageous and Strong}, our Bishop and Young Women President gave talks.  Then we had an awards assembly.  We bought the girls little trophies {from Oriental Trading} and gave them awards based on a Value Experience or Value Project that they have been working on this year.  Some of the awards were:  Designing Diva, Pit Stop Princess {for learning more about how to take care of her car}, Quilting Queen, Stellar Scientist, Scripture Immersion {for reading the BofM in a month}, and so on.
We have an amazing group of Young Women!

Tuesday, November 2, 2010

Grateful Front Door Decor...made from a Charger!!!

Yesterday I happened to look down and see my Thanksgiving chargers
 that I have and instantly envisioned it to be on my front door! 
Even though I had tons to do yesterday
{we have Young Women in Excellence tomorrow...
hopefully I will have pictures of that up soon!},
I whipped this one together fairly quick.
Another super easy project! 
I also love it when I have everything on hand
 and no "quick" trips to HobLob!
The gold actually "glows" from down the street. 
I am sure my neighbors are wondering what the heck
I have on my front door!
 Gathering stuff...
 I was able to "MacGyver" how the plate is hung from the back using a brooch pin.
 Enjoy your day!
Featured on:
Linked to:

Monday, November 1, 2010

Grateful Display...Part 1

This is the first of my Thanksgiving Decor for my entry table...
I love the big glitter letters!!
I am working on my front door decor this afternoon!
This is the before, many of you may have something like this already around your house that would be super easy to turn into a seasonal decor piece!  I attached everything with 3-D glue dots, so they will be easy to come off!
Leslie, do you recognize this? :)
Have a wonderful Monday!

Friday, October 29, 2010

Feelin' Grateful!!

I started on my first Thanksgiving Project today! 
I just love the colors of fall!!
This is just a sneak peak, I will have it on display Monday
once I put my Halloween decor up!
 I bought the letters at my favorite flea market...
Speaking of flea market, my sister is at the Canton, TX mega flea market weekend today! 
I am super jealous!
 This is how I made the flower...

 Then attach the ribbon to the back of the fabric flower.
Have a fun Halloween weekend!

Wednesday, October 27, 2010

Flowers for Silent Auction

I am donating this for my son's Costume Carnival Silent Auction.
The money that it makes will go directly to his classroom.
 The flower in the bottom middle section is my new favorite. 
I made it with embossed felt, so it gives it a little texture! 
I have a mix of brooches and barrettes, with one bobby pin.
For the display, I thought it would be nice for people to see it in a hair bow holder
that is included!
I hope that it makes some moo-lah for his teacher!!

Monday, October 25, 2010

For my 3 Sister-in-laws...

***I don't know for sure if my Sister-in-law's read my blog...so, if Anna, Olivia or Jenn happens to read this just act surprised when you get it in the mail! :)***
I have 3 sister-in-law's that have birthdays within about a week from each other. 
They are super-cute and always are in fashion. 
{one of my sister-in-law's and I share the same name, she is just much younger and beautiful!}
I had fun putting these presents together for them,
I hope that they will enjoy them.
I found cute scarves that were needing
a little something added to it...a cute fabric rose brooch. 


 My packaging...I love using clear bags that I order from http://www.clearbags.com/.  I always have some on hand!

Wednesday, October 20, 2010

Mr. Spider...Bead Art

I have been wanting to make Mr. Spider for a while, I finally sat down and made him!
 While I was online looking for a good spider for inspiration, I found this cross stitch pattern.
I just used a little sharpie pen and made tiny dots on the orange satin to mark my pattern
{I "eye balled" it, so it isn't perfect at all!}.
I had to make it smaller because
I have a small frame to put it in.
 Once I got in my groove sewing the tiny beads, it didn't take too long!  Super easy project to do!
Have a Scary Day!
Featured on: