Showing posts with label home decor. Show all posts

Thursday, July 14, 2011

Chunky Burlap

Maybe I just like the word Chunky...like Chunky Babies, Chunky Chocolate Ice Cream, Chunky Salsa and now I will add to it Chunky Stretched Burlap!!

I made this for the Canvas Corp packaging picture for their Chunky Burlap.
It actually fits my home decor...I wanted to keep it! :)
I used Chalkstock on this project so you could change the saying or "title" of the decor for seasonal or misc things.
 I used the Tissuestock as a part of the little posey that I made...love that stuff!!

Have a delightful day!

Tuesday, June 21, 2011

Have you ever...

wanted to start all over?
It has taken years for me to accumulate all of the nic-nacs and decor for my house.  But, I almost feel that my taste has been starting to change or maybe I am starting to get into more of a modern clean feel.  Lately I have been so attracted to the Coastal/Beach look...clean, crisp.
{p.s. I am totally addicted to Pinterest...pictures from there}
Dream Kitchen:
Is it because I want to go to the beach really bad?
One of these days I will have a house with cedar shingles! 
I really love the non-fussy, easy going look...
A couple of months ago I loaned a lot of my decor to my friend, Kelly, that was needing to stage her house to sell. Well, I have forgotten the majority of what I let her borrow until she has sold her house and is moving on Friday {I am totally going to miss her!!!}.  She brought back all of my stuff, as you can see in my picture, a few days ago and it is just sitting in my entryway.  I am seriously thinking of selling all of it at the flea market and starting over.{I want to keep the table and the grass}
Have you ever done that...completely start over with a new look?
Do you get attached to something that you have for decor and don't think you can part with it?
What do you think?

Friday, March 18, 2011

Misc Friday...& Banner Contest

Canvas Corp has some amazing Handmade, embossed and flocked paper.
These are some of the samples of them.

One of my favorite places to shop when I go to Utah is Tai Pan Trading.
That is where I got this metal Welcome sign.
I told my husband that we are going to pack light this summer when
we go to visit because I will pack it to the max for the ride home.

Don't forget to enter in the Canvas Corp Banner Contest!
You have a chance to win some amazing product packages!
Here is the link to all of the info:
Please email me if you have any questions!!


Today we had to do a little updating of our computer and printer...
It was a long time coming, but we just couldn't drag it on any longer.
Good bye slower than molasses computer, hello mega speed!
So, I was able to get the nicest printer that I have ever had.
No more trips to *-Mart for photos!!
I chose an Epson Artisan 835 because it is more for the person
that wants to print out quality photos...like me!
Have a fabulous weekend!

Friday, February 11, 2011

Valentine's Day Display...

I wish that I would have done this project earlier since
Valentine's day is on Monday...
I will probably just leave it up for a little while longer.
Spring Decor Projects are on my mind, I am
ready for warmer weather!
This Red Berry wreath has seen better days...I just
will never part with it. :)  One of those favorites of mine!
I made the heart using Canvas Corp Burlap & Canvas shapes.
It was a quick project to do...with American Crafts Thicker letters.


The vertical garland was a fun twist for me,
I normally make garland going horizontal. 
I used a heart punch with Canvas Corp Papers, Beacon Fabric
Tac glue to attach the CC twine and the hearts. 
 I met an amazing scrapbook artist, Nathalie Kalbach, from Germany
and she contributes to a Magazine called ScrapArtZine
I found a tutorial in the issue that she gave me on how to do
these flowers {by Tina Schubert}.  The instructions were in
German, but I was able to figure it out with pictures. :)
You just punch out 3 different sizes of circles, pierce a tiny hole
in the middle, place a brad in the middle to hold it together
and then fold/wrinkle up the edges. 
I loved how simple it was to get a great look!!
The bottom flower I made from Canvas Corp's new handmade paper
line, I will definitely be making more of them!!
Have a wonderful Friday!
Linked to:

Wednesday, October 6, 2010

A Framed Napkin...yes, I framed a napkin!!

I would've never thought about using a napkin in my decor...but it works.
I found this napkin at Walmart and thought is was too cute to be used as a napkin!  I had an extra frame just like the one I used for my Spider Web String Art that I got from Goodwill...the fit was perfect!
This was the quickest project ever!! :)
  Have a boo-tiful day!!
Featured on:
Three A's and a C Blog
Be Different, Act Normal
Tatertots and Jello Facebook Page
That Village House
Linked To:

Monday, April 26, 2010

Altered Lampshade Tutorial...using burlap & felt

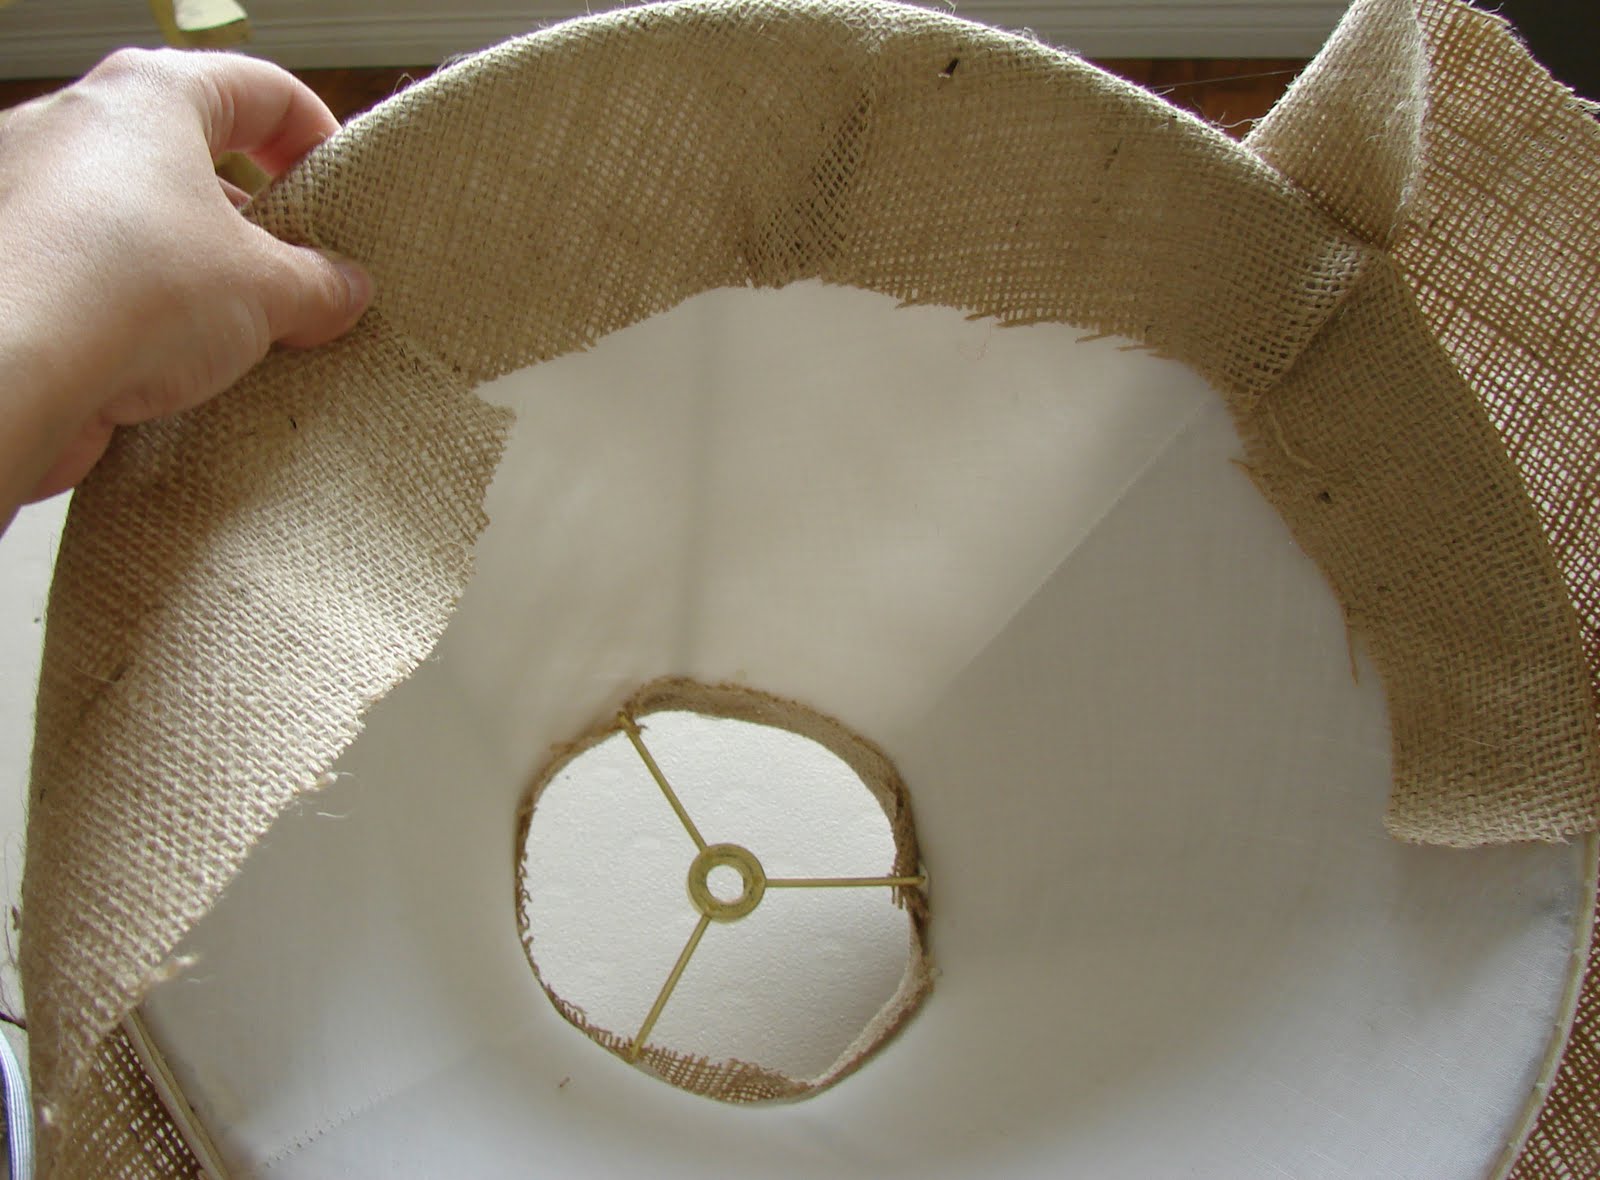
I have been wanting to alter this lampshade for the longest time.  As you can see in the before picture, it really didn't go with my decor...at all!
One thing that I did learn from this project is to iron out the wrinkles in the burlap before attaching.  I was on a roll and didn't notice until it was all done.  I will have to do some fancy steaming work on it.
I used freezer paper do make my pattern out of.  I cut the beads off first {I will definitely use them later!}.  Then I just drew a line as a rolled the lampshade in a half circle.  I wasn't precise with it, I am sure that there are always better ways of doing everything I do. :)
Once I cut this half circle, I fliped the pattern over and ended up cutting a whole circle out.  I then trimmed the excess off. 
I attached the top first.  Hot glue loves to come through the fibers of the burlap so the clothes pins helped save my fingertips!
I just made a ruffle on top.  {I also finished out the insides with thinner black ribbon, I just didn't include a picture of it}
Cut out 2 in. circles out of felt, whatever color you want.  Then you make a dot of hot glue in the middle and fold one side then the other to form what my son called a "TACO".
Once the hot glue is cooled off, cut in the middle which forms 2 individual pieces for the trim.
Lots of hot gluing!  You just have to make enough for your size of lampshade!
I also made that fabric flower to attach to the top side of the shade...it just needed just a little bit more.
The possibilities are endless...I have several more that I am planning on changin' up soon!!
Enjoy!!!
Linked to:
Keeping it Simple
Between Naps on the Porch
The Girl Creative
Making the World Cuter
Chocolate Sundaes
Reinvented: Trash to Treasure Tuesday
My Frugal Family:  Talented Tuesday
A Soft Place to Land
Today's Creative Blog

Monday, April 19, 2010

Blue Bird Flour Sacks


My mom is so cute...she saved all of the flour sacks {5,10,20lb sizes} for me that they used during their mission to New Mexico.
Aren't they pretty?
I just shook out the flour and filled it with batting, then tied a bow around it.
It could even add a little whimsy to a tablescape.  My mom washed a couple of them and they have that nice faded look.  I really like the vibrant colors, though.  She even called up the flour mill and they would sell the sacks individually!
What would you do with a flour sack?  Make a pillow, frame it, apron...leave a comment and let me know!!!
Linked To:
The Girl Creative
Talk About it Tuesday
Reinvented:  Trash to Treasure Tuesday
Someday Crafts:  Whatever Wednesday
Blue Cricket Designs
My Backyard Eden

Monday, March 15, 2010

Vintage Window Stitch

I did this stitch years ago when my sis-in-law gave me the stitch to do on our long drive from visiting in Utah.
I found this window at my favorite flea market and it originally had an ugly quilt stapled in it...I usually love quilts, but this one was seriously not good.
The Stitch says:
"I have no greater joy than to hear that my children walk in truth"
3 John 1:4
I know that I want to hear my children walking in truth...
The size of the window is about 36"x18", right now it is in our Master Bedroom but I am thinking of relocating it soon.
I have tons to do for the Relief Society Meeting on Thursday, so no crafting today.  I will definitely be taking tons of pictures when we have it all set up for "Zion's Mall" and have more info on what we did for those of you that are interested.
Have a Joyous day!
Linked to:
Cottage Instincts:  Make it for Monday
The Graphics Fairy:  Brag Monday
Twice Remembered: Make your Monday
The Girl Creative:  Just something I whipped up Monday
Keeping it Simple:  Motivate Me Monday
It's So Very Cheri: It's so very Creative 

Friday, March 12, 2010

Nesting

Today I crafted with Leslie and we got a lot done!  We made this hanging nest {there are eggs in the bucket}.  We saw this idea somewhere and I can find our reference or I would link to it {I will update when I find it}
It was super easy to make:
1 bucket
3 types of ribbon {we also used tulle}
Excelsor filling
Tag
Leslie is really good at making bows, so she made mine.  She just attached it with hot glue to the bottom of the bucket.
After she left, I decided to make some tags to go with it.  {one for me, one for Leslie}
I used canvas as the base of the tag.  Inked the edges with black.  I had some paper that looked like grass to me... I love the little alphabet stickers by EK Success.  Then I just used a sharpie and wrote "blessings".  Super easy!!
Leslie and I were inspired by Becky's nest in her sifter.  See it here on her blog:  Beyond the Picket Fence.
This is all Leslie's creation that I had to share with y'all.
She had her mother-in-law's vintage sifter and made this beautiful nest!
Thanks Becky for inspiring us!  Now I have to go find a sifter for me!!!
Have a delightful weekend!
Linking to:
Tatertots and Jello
My Romantic Home
That's So Cuegly: Craft Concoction
The Shabby Nest: Frugal Friday
Funky Junk Interiors


The Shabby Chic Cottage

Monday, March 8, 2010

Pottery Barn Key Display

This project was super easy!  I went over to Pottery Barn the other day and found this set of 7 keys for $19.  I thought that was a pretty good deal.  {Here is a link to the keys}.  I love keys and I have collected several sets over the years.  These keys are definitely meant to be displayed.
I have them in my living room right now, I am sure that they will find a new home soon!
I just had to show you the nest I made out of burlap left overs...I just gathered some of the burlap threads into a circle and put the birdie in the middle.  It is kind of hard to see it in the glare of the glass.
I love the color of the keys!  Matched my walls perfectly.
This is a frame that I have had for a while that had 3-5"x7" pictures of my boys in it, then I had a baby girl and it didn't work anymore for kids pictures.  {the frame is from Hobby Lobby and measures 31"x13 1/2"}
I actually filled in the picture opening with foam core {a staple in my craft room} and then layered white cotton fabric over it before I wrapped it with the burlap.
I will most likely add some other element to the frame...when I do I will post it.
Enjoy!!!
LINKED TO:
Cottage Instincts:  Make it for Monday {I am also featured on that blog with my nest}
Graphics Fairy: Brag Monday
Twice Remembered:  Make your Monday
It's So Very Cheri
The Girl Creative:  Just something that I whipped up Monday
Keeping it Simple:  Motivate Me Monday
The Persimmon Perch:  Made it Monday
Sumo's Sweet Stuff:  Market yourself Monday
Room to Inspire:  Be Inspired
The Inspired Room

Saturday, March 6, 2010

Bird Delight Stitch

I stitched this a couple of years ago.  I used Heidi Swapp's scrapbook paper with a bird for a template.  I did the font myself.
I used to be a part of a monthly stitch group and used to stitch all the time. 
To do this project, I used everything that I had on hand.  I just painted the frame black & tea-dyed muslin.  {I don't drink tea, but I have some on hand for projects like this}
The flower is actually attached to the glass on the outside.  I just layered a flower then cut out 2 different sizes of circles and folded them to give a petal look.  The bling in the middle is from the flea market, I bought it knowing that I would be able to use it somehow.
Have a fabulous weekend!
Linked to:


Funky Junk's Saturday Nite Special
The DIY Show Off
Life in the Pitts
Featured on Life in the Pitts blog: Here!!!